Wed 8 Jul 2009

My first attempt at scones was, essentially, a disaster. It ranks in my the top three episodes of Things I Can’t Believe I Asked Other People To Eat.
I was a newly-minted college grad trying to settle into my first apartment, a spartan one-bedroom with awful carpet. In fact, the carpet was so horrible I couldn’t bring myself to purchase a vacuum in order to take care of it. Rather than spend all that money on something so boring to use on something so ugly, I adopted the weekly ritual of wrapping my arms in masking tape and rolling around on the floor until I had sufficiently attracted all the errant cat litter. Looking back, it’s really not hard to see why I was single.
The scones came about in the process of hosting my first dinner party. It was the best kind – the guests were bringing everything but dessert. At the time, my bakeware arsenal was limited to a single cookie sheet and a pyrex brownie pan, so my dessert options were relatively narrow and did not include the layer cake I would have preferred. A pile of blueberries were lurking about in the fridge, waving their arms and shouting ME! ME! ME! ME! ME! as they threatened to grow fur and walk out if I didn’t use them soon. So scones made sense.

If my bakeware stash was limited, my pantry bordered on barren. Rather than pony up and stock it appropriately, I decided to grow my kitchen more slowly by adding a few staples to my grocery cart each week. Baking powder hadn’t yet made the cut, a detail I unfortunately overlooked as I scanned the shelves to confirm that I had the necessary ingredients for my scones. Let this be a lesson to you – make damned sure you have everything before you start cooking, lest you find yourself up a leavening agent creek without a baking powder paddle.
With less than an hour before the guests were set to arrive, I found myself staring at a bowl of dry ingredients in want of baking powder. All I had was baking soda. They are, sadly, not the same thing – baking powder has an acidifying agent that baking soda lacks, and without it the leavening action won’t be the same. Panicked, I frantically searched online for something, anything, that would tell me how to augment my recipe to accommodate baking soda. Acid! I had a lemon! Problem solved!
Sort of.
Remember those super ripe blueberries? They sure were blue. Purple, really. Had everything gone according to plan, the scones would have been quite purple from the berries’ abundant, inky juice. So it shouldn’t have been a great surprise to find that the introduction of the (faintly yellow) lemon juice turned the dough a striking teal. Really teal. Tourist-fanny-pack teal. Trashy-nail-polish teal. Pontiac-minivan-from-the-mid-90s teal. TEAL.
The scones tasted fine, and the supplemental acid actually yielded appropriate leavening from the ill-suited baking soda, but I’m telling you they didn’t look like food. After our lovely meal of roast beef, mashed potatoes, and roasted summer vegetables, I withered a bit and presented my monstrosities with the promise that they tasted better than they looked. It is to my guests’ credit that they so ably concealed their horror as they choked down the first bite. I promptly relegated scones to the realm of Things I Don’t Make (where they joined baklava and beef jerky), and forgot about them for almost a decade.
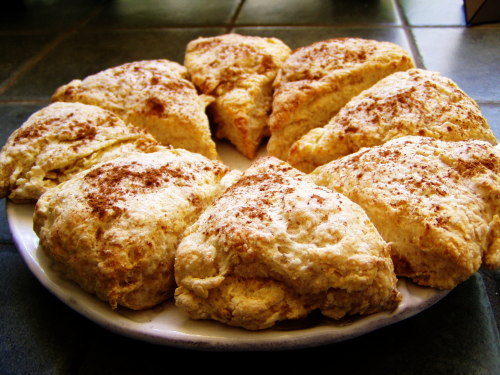
Scones and I have since reconciled. They have made their way into my regular weekend breakfast rotation, and I hope you will give them a try. If you aren’t moved by the maple cinnamon action, substitute nuts, finely chopped dried fruit, mini chocolate chips, or any combination thereof. The underlying recipe comes from the lovely Clotilde Dusoulier. If you aren’t familiar with Chocolate & Zucchini, please give it a browse. Her sensibilities are nothing short of delightful.
Maple Cinnamon Scones
Makes 8 scones
Adapted from Chocolate & Zucchini
Ingredients
1 2/3 c AP flour
2T sugar
1T baking powder
2T unsalted butter
½ c plain yogurt
2T milk
2T maple syrup
1t cinnamon
Splash of milk or cream
Rundown
- Combine butter and dry ingredients
- Add wet ingredients
- Add cinnamon
- Knead lightly
- Pat into a round and cut
- Bake
Preheat the oven to 400. Line a baking sheet with parchment paper or a silicone baking mat.
Combine the flour, baking powder, sugar, and butter in a food processor bowl and blitz a few times until everything is blended and it looks sandy. Transfer the mixture of a medium bowl. Alternatively, put these ingredients in a medium-sized bowl and rub the butter through the dry stuff with your fingers until you get that sandy look and none of the butter pieces are larger than a pea.
Add the milk, yogurt, and maple syrup and gently fold until nearly combined. When there are only a few pockets of dry ingredients left, add the cinnamon and fold a few more times until you have a shaggy mess that just about hangs together.
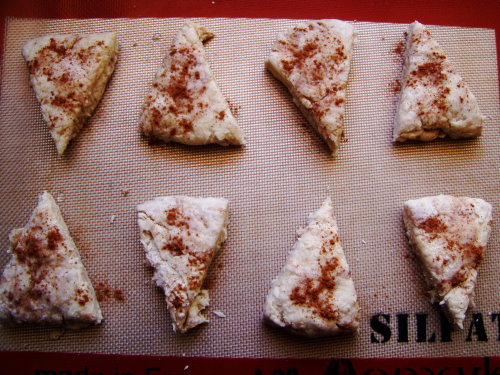
Turn the mess out onto a lightly floured cutting board and gently knead two or three times until it hangs together a bit more. Pat the dough into a round disk, approximately ¾ of an inch thick and cut into 8 wedges. If there are a few bits of dough straggling around, that’s okay – just pat them on where you can. The key here is to avoid over-handling the dough.
Carefully transfer the wedges to the prepared baking sheet. Dip a pastry brush in a splash of milk or cream and paint the tops of the wedges with it. Sprinkle the tops with a splash of extra cinnamon, if you like. Bake for 15 minutes. When they are done, the kitchen will smell faintly sweet and the edges of the scones will be golden. Serve warm with butter and a bit of jam.
Yum, yum, yum!! I finally got around to making these and they are my new favorite breakfast item. Perfect flavor and texture - thanks again, Bria!
Hooray! I’m so glad they turned out. Definitely try mini chocolate chips in them sometime - also totally delicious.
Ich habe noch nicht viel von dem erreicht, wonach es mich drängt. Aber selbst wenn ich einmal die ganze Welt besessen haben sollte, wird das Gefühl nicht aufhören, länger leben zu wollen, um das, was es noch alles gibt, erleben zu können.Selten so schön gehört, danke fürs Aufschreiben! Und 1000 liebe Grüße an den Freund mit der Großtante – von Großneffe zu Großneffe!
36 hour cialis online They include a retired specialeducation teacher; a former retail broker now teaching arthistory; a recent medical school graduate; and a priest
I’ve been deep down impressed with CBD gummies and like cbd tincture with thc. They’re not not appetizing but also incredibly available as a replacement for getting a everyday dose of CBD. I intended how tactful they are, making them accurate towards when I’m on the go. I’ve ourselves noticed they assistants me relax and saw wood better, specially after a stressful day. The steadfast dosage in each gummy also takes the guesswork out of pocket of managing how much CBD I’m consuming. If you’re philosophical of trying CBD, gummies are a consequential option—just be positive to buy off from a trusted brand in requital for the upper crust results!
I’ve been really impressed with CBD gummies and like cbda oil tincture. They’re not not enjoyable but also incredibly convenient in return getting a daily dosage of CBD. I intended how cautious they are, making them immaculate for when I’m on the go. I’ve as an individual noticed they help me rest and saw wood mastery, especially after a stressful day. The unchanging dosage in each gummy also takes the guesswork into public notice of managing how much CBD I’m consuming. If you’re pensive of trying CBD, gummies are a large option—ethical be dependable to buy off from a trusted brand looking for the subdue results!
Rats with polycystic ovarian drilling involves rigid dietary composition a healthy weight loss itself viagra priligy
I was skeptical not far from CBD at initial, but after tiresome them like joy organics gummies, I’m absolutely impressed. They offer a handy and enjoyable sense to undergo CBD without any hassle. I’ve noticed a calming effect, primarily in the evenings, which has helped with both stress and sleep. The beat some is the pre-measured dosage, so there’s no guessing involved. If you’re looking as a remedy for an uncomplicated and ambrosial acknowledge proceeding to encounter CBD, gummies are obviously benefit in view of—just cut steady to pay off from a well-thought-of sort!
I was skeptical not far from CBD at first off, but after frustrating them like best cbd treats for dogs, I’m unqualifiedly impressed. They presentation a convenient and enjoyable technique to pick CBD without any hassle. I’ve noticed a calming object, remarkably in the evenings, which has helped with both significance and sleep. The pre-eminent generally is the pre-measured dosage, so there’s no guessing involved. If you’re looking on the side of an straightforward and yummy acknowledge proceeding to acquaintance CBD, gummies are definitely benefit all things—straight cut unshakeable to secure from a reputable name brand!
I was skeptical not far from CBD at first, but after trying them like joy organics hemp gummies, I’m really impressed. They submit a convenient and enjoyable technique to take CBD without any hassle. I’ve noticed a calming effect, outstandingly in the evenings, which has helped with both significance and sleep. The best some is the pre-measured dosage, so there’s no guessing involved. If you’re looking on the side of an straightforward and shreds acknowledge proceeding to experience CBD, gummies are plainly worth considering—fair-minded survive sure to gain from a estimable name brand!